Continuamos con esta serie con comenzó en MIC031S En esta segunda parte de este artículo veremos cómo utilizar operadores para la comparación de cadenas, comprobar cuántos caracteres tiene una cadena y cómo quitar los espacios en blanco. Parte 1 en MIC031S.
OPERADORES PARA COMPARACION DE STRINGS.
Para comparar 2 strings y comprobar si son iguales, se puede usar el operador '=='. La comparación es sensitiva a mayúsculas y minúsculas (case-sensitive), significando con esto que la string "hello", no es igual a "HELLO". Para saber si las strings son diferentes podemos usar el operador '!='. También es posible saber si una string es mayor o menor que otra string. Para esto podemos usar los operadores '>' y '<'.
Estos operadores funcionan en base a la posición que los caracteres ocupan en el set de caracteres ASCII. Para comparar string, tambien podemos usar la función equals(). En el siguiente programa se usan varios de estos operadores y puede ser encontrado en el menú: Archivo->Ejemplos->Strings->StringComparisonOperators. El diagrama de flujo puede ser observado en la Figura 10.

String stringOne, stringTwo;

void setup() {

   // Open serial communications and wait for port to open:
   Serial.begin(9600);
   while (!Serial) {
      ; // wait for serial port to connect. Needed for native USB port only
   }
   stringOne = String("this");
   stringTwo = String("that");
   // send an intro:
   Serial.println("\n\nComparing Strings:");
   Serial.println();

}


void loop() {

   // two Strings equal:
   if (stringOne == "this") {
      Serial.println("StringOne == \"this\"");
   }

   // two Strings not equal:

   if (stringOne != stringTwo) {
      Serial.println(stringOne + " =! " + stringTwo);
   }

   // two Strings not equal (case sensitivity matters):

   stringOne = "This";
   stringTwo = "this";

   if (stringOne != stringTwo) {
      Serial.println(stringOne + " =! " + stringTwo);
   }
   // you can also use equals() to see if two Strings are the same:

   if (stringOne.equals(stringTwo)) {
      Serial.println(stringOne + " equals " + stringTwo);
   } else {
      Serial.println(stringOne + " does not equal " + stringTwo);
   }

// or perhaps you want to ignore case:
   if (stringOne.equalsIgnoreCase(stringTwo)) {
      Serial.println(stringOne + " equals (ignoring case) " + stringTwo);
   } else {
      Serial.println(stringOne + " does not equal (ignoring case) " + stringTwo);
   }

   // a numeric String compared to the number it represents:

   stringOne = "1";
   int numberOne = 1;

   if (stringOne.toInt() == numberOne) {
       Serial.println(stringOne + " = " + numberOne);
   }

   // two numeric Strings compared:
   stringOne = "2";
   stringTwo = "1";

   if (stringOne >= stringTwo) {
      Serial.println(stringOne + " >= " + stringTwo);
   }

   // comparison operators can be used to compare Strings for alphabetic sorting too:

   stringOne = String("Brown");
   if (stringOne < "Charles") {
      Serial.println(stringOne + " < Charles");
   }

   if (stringOne > "Adams") {
      Serial.println(stringOne + " > Adams");
   }

   if (stringOne <= "Browne") {
      Serial.println(stringOne + " <= Browne");
   }

   if (stringOne >= "Brow") {
      Serial.println(stringOne + " >= Brow");
   }


   // the compareTo() operator also allows you to compare Strings
   // it evaluates on the first character that's different.
   // if the first character of the String you're comparing to comes first in
   // alphanumeric order, then compareTo() is greater than 0:

   stringOne = "Cucumber";
   stringTwo = "Cucuracha";

   if (stringOne.compareTo(stringTwo) < 0) {
      Serial.println(stringOne + " comes before " + stringTwo);
   } else {
       Serial.println(stringOne + " comes after " + stringTwo);
   }


   delay(10000); // because the next part is a loop:


   // compareTo() is handy when you've got Strings with numbers in them too:


   while (true) {

      stringOne = "Sensor: ";
      stringTwo = "Sensor: ";
      stringOne += analogRead(A0);
      stringTwo += analogRead(A5);

      if (stringOne.compareTo(stringTwo) < 0) {
          Serial.println(stringOne + " comes before " + stringTwo);
      } else {
         Serial.println(stringOne + " comes after " + stringTwo);
      }

   }

}
CREANDO O CONSTRUYENDO STRINGS.
Para crear o construir strings en un programa existen varias maneras. En la siguiente lista se muestran algunas de ellas:
String stringOne = "Hello String"; // usando una constante String.
String stringOne = String('a'); // convirtiendo una constante char en un String.
String stringTwo = String("This is a string"); // convertiendo una constante string // en un objeto String.
String stringOne = String(stringTwo + " with more"); // concatenando 2 strings
String stringOne = String(13); // usando una constante entera (integer)
String stringOne = String(analogRead(0), DEC); // usando un int y una base
String stringOne = String(45, HEX); // usando un int y una base (hexadecimal)
String stringOne = String(255, BIN); // usando un int y una base (binary)
String stringOne = String(millis(), DEC); // usando un long y una base
String stringOne = String(5.698, 3); // usando un float y lugares decimales.
En el siguiente programa usamos varios de estos constructores para crear strings. El compilador analiza que variables recibe la string en sus parámetros y de acuerdo a esto crea las respectivas string. A esto se le conoce en lenguaje C++ como sobrecarga de funciones.
Es decir que con el mismo nombre de una función, se pueden hacer varios tipos de función. El siguiente programa ejemplo puede ser encontrado en el menú: Archivo->Ejemplos->Strings->StringsConstructors. El diagrama de flujo puede ser observado en la Figura 11.

void setup() {

   // Open serial communications and wait for port to open:
   Serial.begin(9600);

   while (!Serial) {
       ; // wait for serial port to connect. Needed for native USB port only
   }


   // send an intro:
    Serial.println("\n\nString Constructors:");
    Serial.println();
}


void loop() {

   // using a constant String:
   String stringOne = "Hello String";
   Serial.println(stringOne); // prints "Hello String"
   // converting a constant char into a String:
   stringOne = String('a');
   Serial.println(stringOne); // prints "a"
   // converting a constant string into a String object:
   String stringTwo = String("This is a string");
   Serial.println(stringTwo); // prints "This is a string"
   // concatenating two strings:
   stringOne = String(stringTwo + " with more");
   // prints "This is a string with more":
   Serial.println(stringOne);
   // using a constant integer:

   stringOne = String(13);
   Serial.println(stringOne); // prints "13"

   // using an int and a base:
   stringOne = String(analogRead(A0), DEC);
   // prints "453" or whatever the value of analogRead(A0) is
   Serial.println(stringOne);
   // using an int and a base (hexadecimal):
   stringOne = String(45, HEX);
   // prints "2d", which is the hexadecimal version of decimal 45:
   Serial.println(stringOne);
   // using an int and a base (binary)
   stringOne = String(255, BIN);
   // prints "11111111" which is the binary value of 255
   Serial.println(stringOne);
   // using a long and a base:
   stringOne = String(millis(), DEC);
   // prints "123456" or whatever the value of millis() is:
   Serial.println(stringOne);
   // using a float and the right decimal places:
   stringOne = String(5.698, 3);
   Serial.println(stringOne);
   // using a float and less decimal places to use rounding:
   stringOne = String(5.698, 2);
   Serial.println(stringOne);
   // do nothing while true:

   while (true);

}
LOCALIZANDO UN STRING DENTRO DE OTRO STRING.
Para localizar un string dentro de otro string podemos usar la función: string.indexOf(val) donde el parámetro 'val' es el carácter o string a buscar. La función retorna el índex de 'val' dentro del string o -1 caso no sea encontrado el string. También podemos usar la función: string.indexOf(val, from) donde el parámetro 'from' recibe el índex desde donde iniciar la búsqueda.
Las funciones anteriores comienzan la búsqueda desde el inicio del string. Si queremos iniciar una búsqueda a partir del final (end) del string, podemos usar la función: string.lastIndexOf(val) o también la función: string.lastIndexOf(val, from). El siguiente programa da un ejemplo del uso de estas funciones y puede ser encontrado en el menú: Archivo->Ejemplos->Strings->StringsIndexOf.
void setup() {

   // Open serial communications and wait for port to open:
   Serial.begin(9600);

   while (!Serial) {
      ; // wait for serial port to connect. Needed for native USB port only
    }

    // send an intro:
    Serial.println("\n\nString indexOf() and lastIndexOf() functions:");
    Serial.println();

}


void loop() {

   // indexOf() returns the position (i.e. index) of a particular character in a
   // String. For example, if you were parsing HTML tags, you could use it:

   String stringOne = "";
   int firstClosingBracket = stringOne.indexOf('>');
   Serial.println("The index of > in the string " + stringOne + " is " + firstClosingBracket);
   stringOne = "";
   int secondOpeningBracket = firstClosingBracket + 1;
   int secondClosingBracket = stringOne.indexOf('>', secondOpeningBracket);
   Serial.println("The index of the second > in the string " + stringOne + " is " + secondClosingBracket);

   // you can also use indexOf() to search for Strings:
   stringOne = "";
   int bodyTag = stringOne.indexOf("");
   Serial.println("The index of the body tag in the string " + stringOne + " is " + bodyTag);

   stringOne = "
      item
      item
      item
   ";

   int firstListItem = stringOne.indexOf("

   ");


   int secondListItem = stringOne.indexOf("

   ", firstListItem + 1);


   Serial.println("The index of the second list tag in the string " + stringOne + " is " + secondListItem);
   // lastIndexOf() gives you the last occurrence of a character or string:
   int lastOpeningBracket = stringOne.lastIndexOf('<');
   Serial.println("The index of the last < in the string " + stringOne + " is " + lastOpeningBracket);

   int lastListItem = stringOne.lastIndexOf("

   ");

   Serial.println("The index of the last list tag in the string " + stringOne + " is " + lastListItem);

   // lastIndexOf() can also search for a string:

   stringOne = "
      Lorem ipsum dolor sit amet
      Ipsem
      Quod
   ";

   int lastParagraph = stringOne.lastIndexOf("<p");
   int secondLastGraf = stringOne.lastIndexOf("<p", lastParagraph - 1);

   Serial.println("The index of the second to last paragraph tag " + stringOne + " is " + secondLastGraf);

   // do nothing while true:

   while (true);

}
AVERIGUANDO CUANTOS CARACTERES TIENE UN STRING (LENGTH).
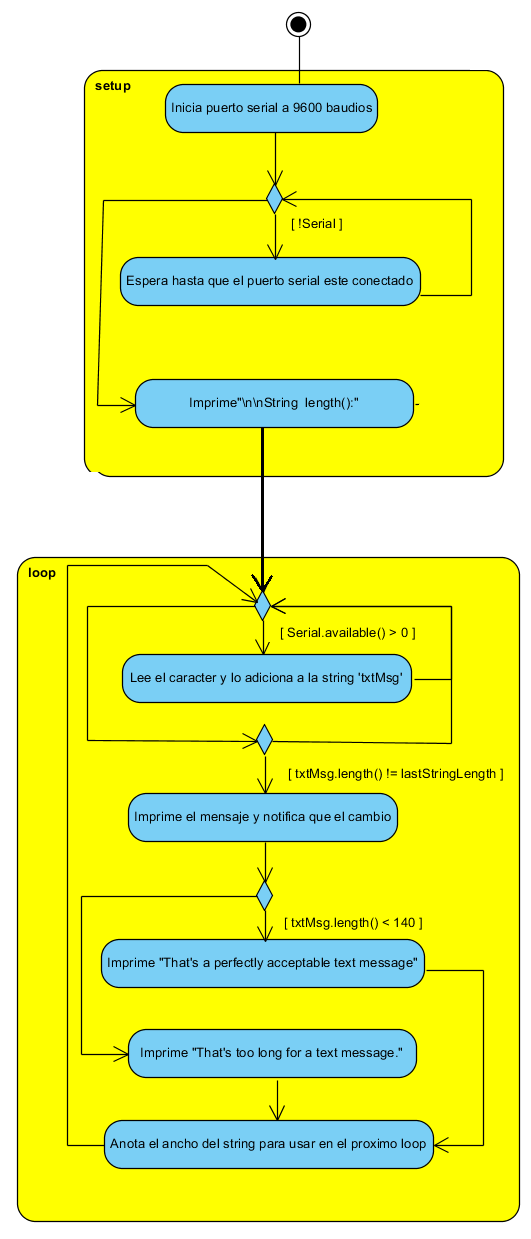
Para conocer cuántos caracteres tiene un string podemos usar la función: string.length() la cual retorna el ancho de caracteres. Esta función no cuenta el último carácter del string, conocido como el carácter null. Este carácter es el hexadecimal 0x00. El siguiente programa usa la función length() y puede ser encontrado en el menú: Archivo->Ejemplos->Strings->StringLength. El diagrama de flujo puede ser observado en la Figura 12.

String txtMsg = ""; // a string for incoming text
unsigned int lastStringLength = txtMsg.length(); // previous length of the String

void setup() {

   // Open serial communications and wait for port to open:
   Serial.begin(9600);

   while (!Serial) {
      ; // wait for serial port to connect. Needed for native USB port only
   }

   // send an intro:
   Serial.println("\n\nString length():");
   Serial.println();

}


void loop() {

   // add any incoming characters to the String:
   while (Serial.available() > 0) {
      char inChar = Serial.read();
      txtMsg += inChar;
   }

   // print the message and a notice if it's changed:
   if (txtMsg.length() != lastStringLength) {
      Serial.println(txtMsg);
      Serial.println(txtMsg.length());

      // if the String's longer than 140 characters, complain:
      if (txtMsg.length() < 140) {
         Serial.println("That's a perfectly acceptable text message");
      } else {
         Serial.println("That's too long for a text message.");
      }

      // note the length for next time through the loop:
      lastStringLength = txtMsg.length();

      }

}
REMOVIENDO LOS ESPACIOS EN BLANCO DE UN STRING (TRIM).
Es común en programación con microcontroladores, encontrar espacios en blanco al inicio y final del string. Para remover estos espacios se puede usar la función: string.trim().
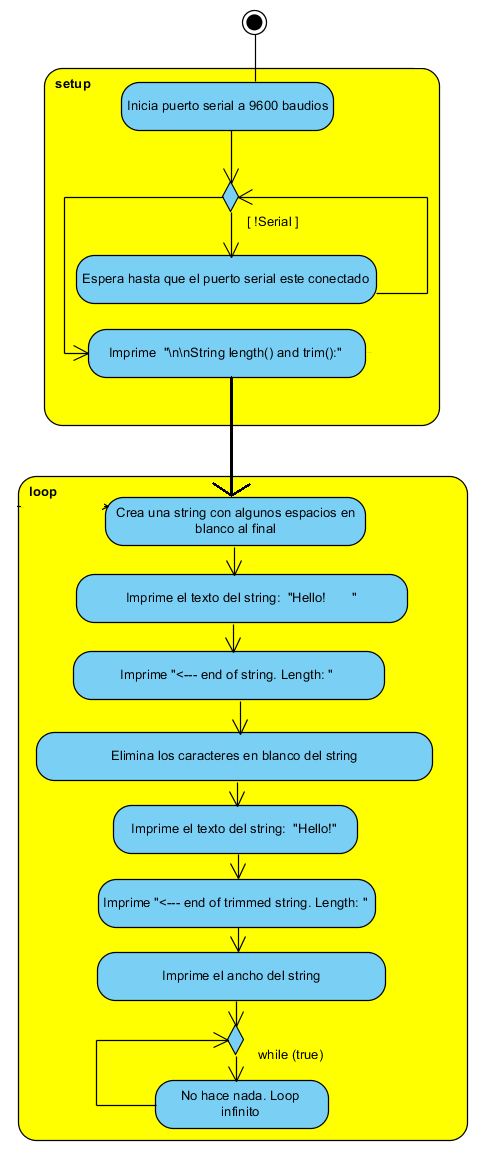
Esta función modifica la string y elimina cualquier espacio en blanco. El siguiente programa hace uso de esta función y puede ser encontrado en el menú: Archivo->Ejemplos->Strings->StringLengthTrim. El diagrama de flujo puede ser observado en la Figura 13.

void setup() {

   // Open serial communications and wait for port to open:
   Serial.begin(9600);
   while (!Serial) {
      ; // wait for serial port to connect. Needed for native USB port only
   }

   // send an intro:
   Serial.println("\n\nString length() and trim():");
   Serial.println();

}


void loop() {

    // here's a String with empty spaces at the end (called white space):
    String stringOne = "Hello! ";
    Serial.print(stringOne);
    Serial.print("
    Serial.println(stringOne.length());

    // trim the white space off the string:
   stringOne.trim();
   Serial.print(stringOne);
   Serial.print("
   Serial.println(stringOne.length());

   // do nothing while true:
   while (true);

}
En la última parte de esta serie (Parte 3 en MIC033S) presentaremos algunos más ejemplos y práctica para trabajar con cadenas de textos con el Arduino Uno.


